Monday, July 30, 2012

Snazzy Summer Update

Hi everyone!  As many of you have already noticed,  my "Sew Snazzy Stitches" and "Gracy Rose" Etsy shops are currently closed.  We've got quite a bit happening over at our house for the first two weeks of August, so I won't be able to take up any new orders.  Both shops will reopen on August 20th with some cute new designs.  Here is a sneak peek of what's to come!

First on the list are these cute new Spa bags.  They can be monogrammed with any name or initial and come in many bright colors.  The two you see below are the smaller size bags I monogrammed for my daughters.  We plan on storing hair accessories and toothbrushes in these when we travel;).

Small Spa Bags - Perfect for children's travel items!

Below are the larger bags.  I made one for myself and plan on using it with my gym bag.  Each bag is fully lined on the inside to allow for easy cleanup in case of spills.  Don't you just love these pretty little things?!!?  I was also thinking they would be a great gift for Christmas, Mother's Day, or a wedding.  If I knew how to do all this back when I was getting married, I would have probably made these for all of my bridesmaids;).

Large Spa Bag in Bubblegum Pink (9"x7"x3.75")
Large Spa Bag in Coral (9"x7"x3.75")

Since a girl can never have enough bags, here is a picture of one I use daily.  Back when I was in college, I had a purse ADDICTION.  Now that I have kids (and have to carry around snacks, diapers, and wipes) the only bag I sport is the dreaded diaper bag!  Small items like lipstick and my wallet were constantly getting lost in that large thing, so I needed something to keep all my items in one place.  This little beauty did the trick and I am no longer fumbling through the diaper bag for my wallet:).

These awesome bags come in three different sizes and can be completely customized.  Customers can choose their own fabric combination and thread colors! 
Custom makeup bag.
Fully lined interior.

SO!...enough with all the bags!  The holidays are just around the corner and, YES, I have already begun preparing!  Believe it or not, I've already sold some super cute turkey shirts.  My shop is really busy during the holidays, so if you need a shirt for that special day, it's always best to order asap before I run out of stock.

Boo-T-Queen Halloween Shirt

Custom Turkey Letters Thanksgiving Shirt
 
Ribbon Turkey Feathers Custom Shirt

And of course, we can't forget about the boys.  All applique shirts can be customized for boys.  Check out these cute sibling Thanksgiving shirts for boys.

Thanksgiving Sibling Set - Onesie
Toddler Thanksgiving Sibling Set

WARNING:  Cute kid alert!!!  Look at this adorable little girl wearing her snazzy reindeer letters shirt last year.  I just love it when customers send me pics of their little ones - it makes my day!

Reindeer Letters Christmas Shirt

Reindeer Letters Christmas Shirt For Boys

Winter Snowflake Shirt

I hope you like all the new items.  They will be available starting August 20, 2012 in my Etsy shop.  Also, be sure to drop by my Gracy Rose Etsy shop for custom infant and children's dresses. 


Take care everyone & I'll see you soon!

Tuesday, June 19, 2012

How To Make A Fitted Tablecloth

A while back, I posted about how my silly girls love pulling on the kitchen tablecloth.  You can find that post here.  WELL... I found a solution to the problem and here is how I did it.   Read on to learn how to make your very own fitted tablecloth:).  A friend of mine actually suggested that it's more like a shower cap, but for your table...LOL!

Note:  There are tons of fabric stores that sell beautiful laminated cotton prints, but they are pricey.  Since our kitchen table takes quite a beating, I didn't want to spend too much on fancy fabric.  Instead, I purchased a cute (round) tablecloth that was on sale at Target....YES, this is the "Semi-homemade" way to make a fitted tablecloth:). 

MATERIALS:
A cute & cheap tablecloth (From WallyWorld or Target)
1 package of 1/4" elastic
sewing machine
thread
scissors
safety pin


 STEP 1:
After you have completely unwrapped your new tablecloth, find the edge and fold it over about 1.5" to 2".  Set your machine to a straight stitch and begin sewing.  Be sure to back stitch a few times so that you can lock your stitches in place.


STEP 2:  Continue sewing a 1.5" to 2" seam around the tablecloth. 


Since you're sewing in a circle, it might be difficult to keep the seam allowance even.  Don't worry, because this part will be under the table where no one can see it!  In the picture below you will see that my seams are not exactly perfect:).


STEP 3:  Sew around the tablecloth, but stop and back stitch about 2" from where you began sewing.  You want to leave a small gap to feed the elastic through.


STEP 4:  Open your package of elastic and attach one end to a safety pin.  I used 46" of elastic for my table, but if you want to make this to your specifications, I suggest not cutting the elastic until the very end.
 

STEP 5:  Feed the elastic and safety pin through the casing that you just made.


When you are done feeding the elastic through the casing, your project should look like this....
 (Top View)
 (Bottom View)


STEP 6:  If you plan on making another tablecloth, secure the elastic by pinning it all together with your safety pin.  I never sew the elastic casing shut because I like to reuse the elastic for other tablecloths when I decide to switch everything out.


Here is my sorry looking table that is just dying to have a splash of color......:(

TaDa!!!!  
This table went from drabbb:(... to FABULOUS in less than an hour and for under $7!!! :)  

Enjoy!  If you decide to make your very own fitted tablecloth, please post a pic on my Sew Snazzy Stitches facebook page.  I would LOVE to see how this turned out for you:).
Nap time is OVER, so I have to get going.  Have a FABULOUS day everyone!!!!

Monday, March 5, 2012

Roses & Dresses - What A Perfect Combination!

Hi everyone!  Back in January I had planned on utilizing this blog a lot more - as you can see I haven't been doing a very good job...LOL!  Even though I have neglected the blog, I am happy to report that the first three months of 2012 have been really busy for me and I've been sewing up a storm!

This spring I've made quite a few dresses for my girls.  Most of the custom dresses are already available on Etsy, but I do have a few that I have not had time to list yet.  For a while, I got so carried away with embroidery and applique, that I forgot how much I loved sewing dresses and other cute clothes for my girls.   

Below are two of my favorite dresses.  I can't get enough of all the rose print fabrics I've been seeing in stores and online!  It's just perfect for making elegant little dresses for church and adds a little "vintage" flair.  You will definitely see more of these prints in my Etsy shop!


Speaking of fabric, I nearly went broke buying this cute "pre-ruffled" pink & white striped fabric.  I got so caught up in how cute it was, that I didn't even look at the price per yard...BIG mistake!  Let's just say that my husband named this dress the "hundred dollar" dress.  ;)

Below is the "Paris Valentine" dress that I made for girls to wear to church.  It's not on Etsy yet, but it will be soon (along with two cupcake surprise birthday dresses!)

 I've got several more dresses to show you, but I'll do that in another post.  See you later & stay FABULOUS everyone!  ;)

Monday, January 2, 2012

2012 Here We Come!!!

WHEW - what a year!!!  I can't believe 2011 is now behind us.  It's been quite a while since I've posted on here but that's only because I've been so busy sewing, embroidering, and having fun with my girls.  Here is a brief summary of what we were up to in 2011....

During the summer months, hooded towels were all the rage.  I made tons of these for cute little guys and girls that were headed to the pool.  The heat this summer was way more than we could handle, so my little divas and I were either hanging out at the neighborhood pool or enjoying lunch with friends.  Here are my little stinkers modeling some of those hooded towels I mentioned earlier.


The heat in Texas can sometimes be unbearable, but that of course won't stop two restless toddlers from wanting to go outside and play.  This summer I also made some stylish wide brimmed hats for my girls to wear while outside.  I love these hats because they provide shade for my little one's neck, face, and ears.  You'll find more of these summer hats in my shop very soon.


In the early summer months I was also busy sewing up several onesie / burpie sets for a little diva in the Houston area.  Her mommy was so easy to work with and I had a great time getting to know her.  Many of my repeat customers have become friends - that's just one of the unexpected perks of starting my own business.  Below are just a few pictures of custom made items for infants.


In the fall, I met a wonderful photographer.  Annie from Sleeping Owl Photography met us at Fisherman's Park and captured some wonderful family pictures.  If you live in the Austin or San Antonio area and are looking to have some pictures taken, I highly recommend Sleeping Owl Photography.  Annie first took some family photos of us and since the girls were still in a good mood, she took pictures of them in their Halloween costumes.  She has also taken pictures of several new products that I have yet to show you all.  I'll be showing off more of her pictures very soon.  If you plan on getting some pictures taken, book your session soon because the secret is out and she very popular;).
You can find her on facebook....
https://www.facebook.com/sleepingowlphotography

Below are a few photos from the Sleeping Owl Photography photo shoot;)


In the month of December, the girls and I had a blast hanging out with friends and family.  Since the girls are a little older, they are starting to understand the whole "Santa" thing.  Even though he brought them a few (okay, A LOT!) of presents this year, they were still a bit unsure of him when it came to take a picture.  My youngest was not impressed with Santa - you can pretty much tell by the look on her face...LOL! 


2011 was such a fun year for us all and I can't wait to see what 2012 has in store.  I hope you all had a great time celebrating the new year as well.  Later this week I will begin accepting custom orders for all of the spring embroidery and sewing designs.  If there is a specific item that you have been wanting to purchase, please email me as soon as you can.  During the months of January and February I'll be busy planning a birthday party, so only a limited amount of orders will be accepted.  Take care everyone and have a FABULOUS YEAR!!!

Tuesday, August 30, 2011

Toddlers & Tablecloths!

My two silly daughters are the inspiration behind most of the stuff I sew.  This project is no exception....

Meet Miss "M". 


It's possible that this little stinker might just grow up to be an interior designer.  She has shown quite a bit of interest in household decorating (which is not always a good thing).


 Here she is rearranging the kitchen tablecloth.


 Since we have two toddlers who insist on feeding themselves, it's inevitable that food and milk will end up spilled all over the table.  My valiant attempt to protect the kitchen table backfired when the girls realized that it was funny to pull on tablecloths and send anything on top of it CRASHING to the ground. 
  
I give you exhibit A...


After just a few tugs, the tablecloth is no longer in it's proper place.  Isn't she setting such a wonderful example for her little sister?  ;)


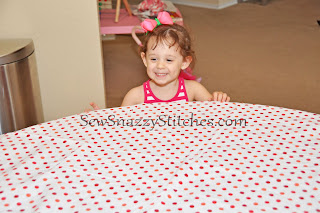
Here is my little designer, standing proudly next to her covered table.  Too bad her days of rearranging the tablecloth are OVER!  This is one war that I actually won!  I came up with a way to keep the tablecloth ON the table and (of course) it involves my sewing machine.


If you are currently experiencing tablecloth "issues", I will be posting a solution soon!  My very first tutorial will be about how to make a fitted tablecloth.  If you have a house full of kids, you have got to try this project.  It's simple and oh so PRACTICAL!  Stay tuned because in my next blog post, I will show you how to make one:).